
QUOTE HEADER:
New Quote Entry
To Create a new Sales Quote for Order Entry go
to the Sales Quote Routines and select Quote Add. A new quote form
is displayed.
QUOTE
HEADER:
On the Quote Header screen there are five REQUIRED fields:
Account #: If you know the account number you can just type it in; if not click on Account #: and this will take you to the A/R Master Search screen. Using the search techniques outlined in AR MASTER SEARCH find the appropriate account and “paste” their information to the quote.
Expiration Date: or date order is good until. System defaults to current date plus 30 days, however, if required, date may be edited.
Written By: Salesman ID #
Order No:
Ship To: Numerical input, which corresponds to shipment destination. Can also be “Will Call” if appropriate.
The remaining fields on the Quote Header are optional, they include:
Type: Refers to the type of order being submitted. Using the scroll bar next to the field Type: select one of the following as it pertains to your order.
Normal – regular delivery ticket
Direct – shipped directly to the customer
Work Order – used to relieve inventory quantities
Return – material the is being returned to stock
VSP – customers with customer catalog prices
Using the same method in #2(a) above, enter the inside salesman’s number in the field Written By:
Shorts Code: Code that gives instructions
on what salesman wants to happen to item if it is not in stock or
available for immediate shipping. Computer Shorts Code default
is set to “Advise”. Other options:
Advise = contact sales person if there are any problems with order
Backorder = ship whatever material is on hand and backorder the rest
Cancel = ship material on hand and cancel the remaining order
Ship
Complete = do not send any material until order is completely
filled
Order #: Enter customers purchase order number if available.
Req #: Enter customers requisition number if available.
Date Required: The date the customer requires the material.
Date to Expedite: Enter the date you want the order to be expedited. If order hasn't been shipped by this date action needs to be taken to facilitate the process.
Freight In/Freight Out: Select 'Billed' if we are billing the customer directly. Select 'Absorb if we are paying the freight. If there is no freight expected to be billed select 'None'.
PPD/Collect: Select 'PPD' (prepaid) if vendors will pay freight directly to freight carrier. Select 'Collect' if Freight carrier will bill.
Payment Type: If Check enter the check number; if Cash type “Cash”; if Credit Card enter the card number – If using a credit card fill in the type of card and expiration date.
Multiplier: If warranted, enter in a price multiplier to be applied only to this order. Multiplier may be up to four decimal places in length. Note that an entry in this field will override any auto pricing that is set up in the customer file.
Basis: Select “Cost” or “Resale” from the drop down menu. This is the number that will be used in conjunction with the multiplier to derive at the correct selling price for this order.
Remarks: An area to type comments and/or special instructions.
To check the ship to address or customer info click on one of the first two buttons at the bottom of the 'Quote Header’.
The Quote Header is now complete and you are now ready to enter the line items for the order.
When
you click 'SUBMIT
ITEMS' (#1 above screen) you
will be taken to the item entry screen below:
Quote
Body Input:
To Enter the line items for the quote proceed as outlined below:
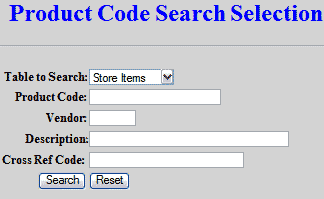
Enter the Product Code = Item Code, Catalog Number, Generic Code or Trade Service Number. If the Product Code is not known select the Search function which will open up the Product Code Search Screen. Using the search techniques outlined in Product Code Search to find the appropriate items. Once an item is located, click on the “Paste” function to insert code into your order. You may search and paste up to 20 items at a time.
 Format for entering Non-Stock
Items onto a ticket and How to add Non-Stock Items.
Format for entering Non-Stock
Items onto a ticket and How to add Non-Stock Items.
Once you have the Product Code inserted on
the item page you can tab to move between fields. At this point
you want to enter as much information as you have, i.e. quantity,
price, multiplier, etc.
Qty Order: Enter the order quantity
Price: Leave this field blank if you want the system to calculate the price. If you enter something here it will not be overwritten. Cost will always be overwritten with the cost from the inventory file if for a Stock item.
Description: Stock description is displayed but may be modified (i.e. for non stock items.)
Product Code: Search and/or enter a new code. If “Item Not in Inventory” message appears, you have entered an invalid code.
Multiplier: If you would like to mark the material up, this is where you would put the multiplier. (Ex. 1.10)
Basis: Basis is used only when you use a multiplier. Choose either Resale or Cost from the drop down box. This is how the price will be calculated if a multiplier is entered.
UM: This stands for Unit of Measure. Make sure that the correct UM is used.
Source Code for the item; either Stock or Non-Stock (SK/NS): This is not where you are getting item from but rather how it is listed in the inventory file. The designation of where you are actually acquiring the item from will be done through DT Sourcing.
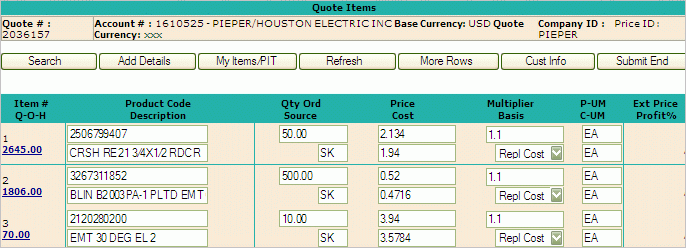
When you are finished entering all the above information press the Refresh button – all the fields that were left blank will now be filled in. Below is an example of what an order line looks like, with all fields filled, after the refresh button is clicked.
![]() If you change quantities on this screen
you must refresh again in order for the items to be updated. If
you make changes
If you change quantities on this screen
you must refresh again in order for the items to be updated. If
you make changes
the defaults
(i.e. pricing or a description) do not hit refresh – doing so will override
what you entered back to the defaults.
At the middle of this page there are several function buttons. They include the following:
Search: As described above, is to be used if you do not know the Product Code or the Generic Code.
Add Details: Add items from a set of details (kits).
MY Items/PIT: If you are working with MY Items or PIT (westore) - selecting this button will allow you to enter items from your 'My Items' or 'Pit' to the quote.
Refresh: Refresh validates all Product Codes, inserts Item Descriptions, Main Bin location, Quantity on Hand, Calculated Net Unit Price, and Calculated Extended price.
More Rows: Use when you have entered 20 items and still have more to add to your order. Cust Info: Tag numbers, special directions, etc
Cust Info: This link will
open the following screen where you can add detail line information
for each line on the quote.

It is recommended
that if a line item on the Quote is to be assembled by the shop, via
a work order, go to the Source Description (above) and insert WO -
this will be over written later when the work order is created but
it is a good way to alert warehouse people and others what is going
to happen with this item.
Submit
End: Select this button when you area finished with
your order and are ready to submit the Quote. Upon selecting
Submit End the following screen
will be generated and you will have a final opportunity to review
your quote. At this point, you will note, that the status
of your quote is Working as
it has not yet been finalized or authorized as an order (following
step).
FINALIZE QUOTE:
Place
Selected items on HOLD:
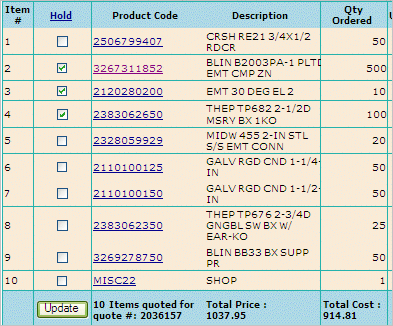
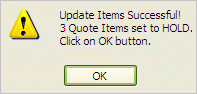
Click Update. A message stating the amount of items put on hold
will be returned.
When you click 'OK' user will be taken back to the quote; all of the
Held items will now be in RED
and will not be converted to a Sales Order when the Quote is authorized.
Add Comments: The Product Code link below (MISC) is presented as a hyperlink. Selecting the Product Code number will allow you to add additional descriptions/comments to each line item.
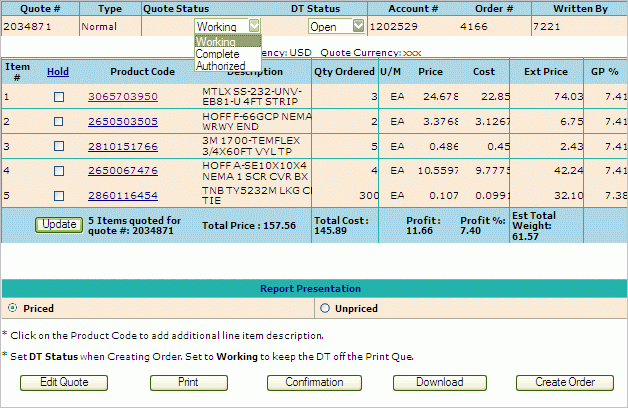
Authorizing Quote: Once you have verified the quote, and it has been accepted by the customer, change the status from Working to Authorized. A status of Working designates that the quote is not completed yet. If not all items are to be authorized the salesman has the option of placing individual items from the quote on hold. Putting items on hold allows the user to keep the quoted information to possibly authorize later or use to create a Clone of the quote which would include all items.
Print the Quote: To print a quote first select whether you want it to print Priced or Unpriced. After selecting the report presentation click Print to immediately send the Quote to the printer.
Print an Order Confirmation: Quote will print as above in #10 but will have a header on it stating "Confirmation of Order #######"
Download Quote: Selecting to download the quote will give user the option of saving the quote to an excel file or downloading/saving in a text file.
Creating an
Order: Once you have Authorized a quote (above),
you then need to create the sales order. Click on Create Order. A box will
appear assigning an order number to your quote and letting you know
that the order was created successfully. You may
also create the order by going to Operations -> Order Entry and
using the Quote to Ticket Function.
* * Once an Order
Number is created for your quote you may not make changes and/or additions
to the quote.
You
may view your quote and/or clone it only.
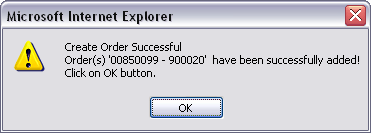
When you click on OK you will be returned
back to the Adding Quote Header screen (step 1).
You are now ready to start the next quote…
![]()